Digital Electronics Final Project

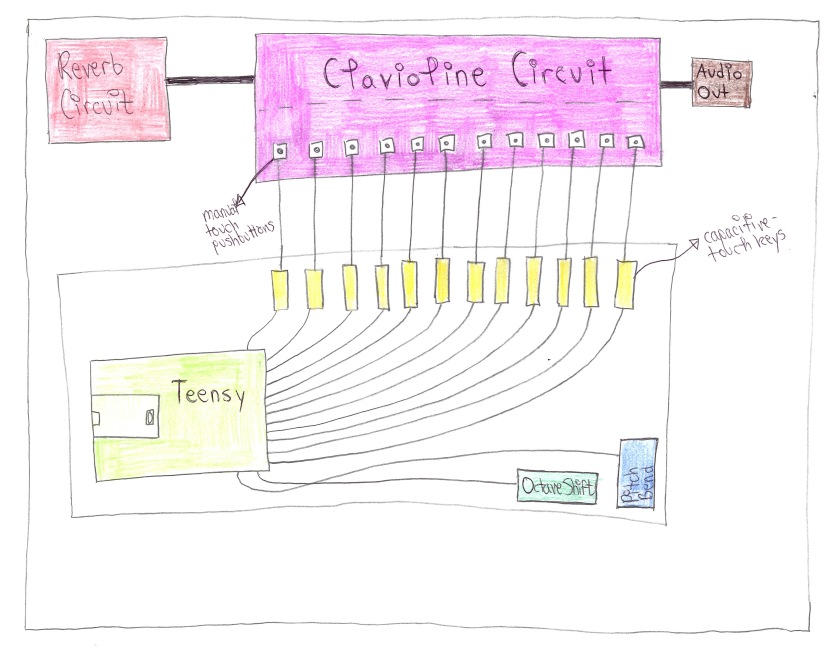
For my final project, I decided to make a touch-capacitive MIDI keyboard that would also be equipped with a pitch bend sensor, octave shift buttons, and a velocity control knob.

This project used Arduino’s CapacitiveSensor library, which allows a user to establish a touch-capacitive sensor using the following code:Screen Shot 2017-05-07 at 5.17.37 PM.png

This indicates that there is a 1 Megohm resistor between digital pins 4 and 2 of the Teensy, and that digital pin 2 is the specific pin for the sensor in question.  All the sensors (aka keys) of this keyboard also need to be connected to one specific pin in order for the code to function– in this case, all of the keys are connected to digital pin 4.

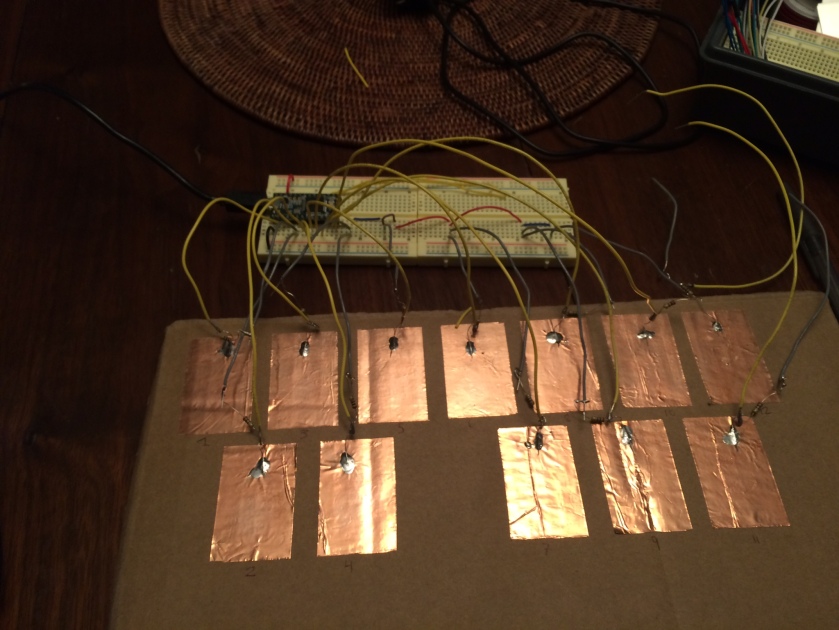
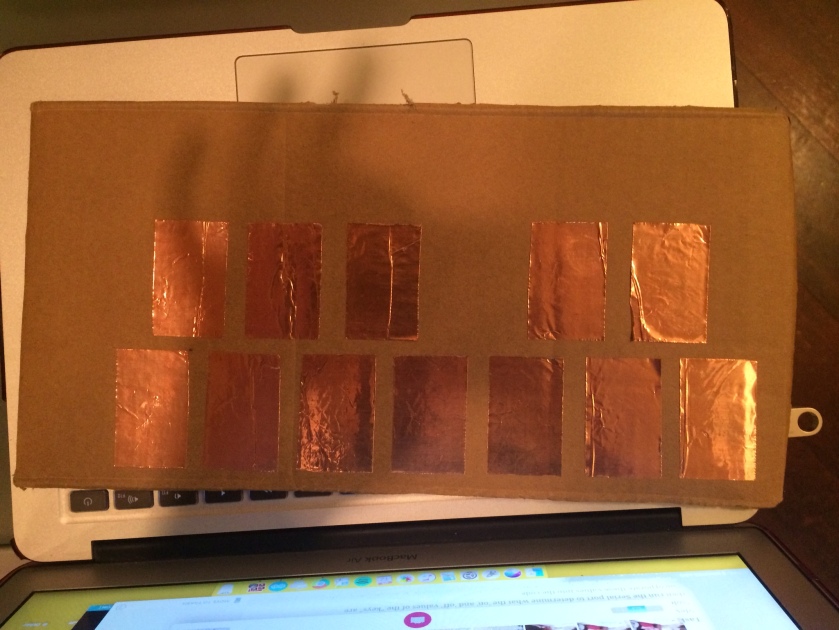
The analog hardware portion of this project was somewhat extensive, and required a fair amount of time to construct.  For the base, I used a rectangular piece of cardboard.  For the keys and the pitch bend sensor, I used strips of copper tape, which has capacitive properties and can be used as a touch sensor.  I placed these keys in a typical keyboard formation, as you can see in the picture below.

IMG_2460.JPG.jpeg

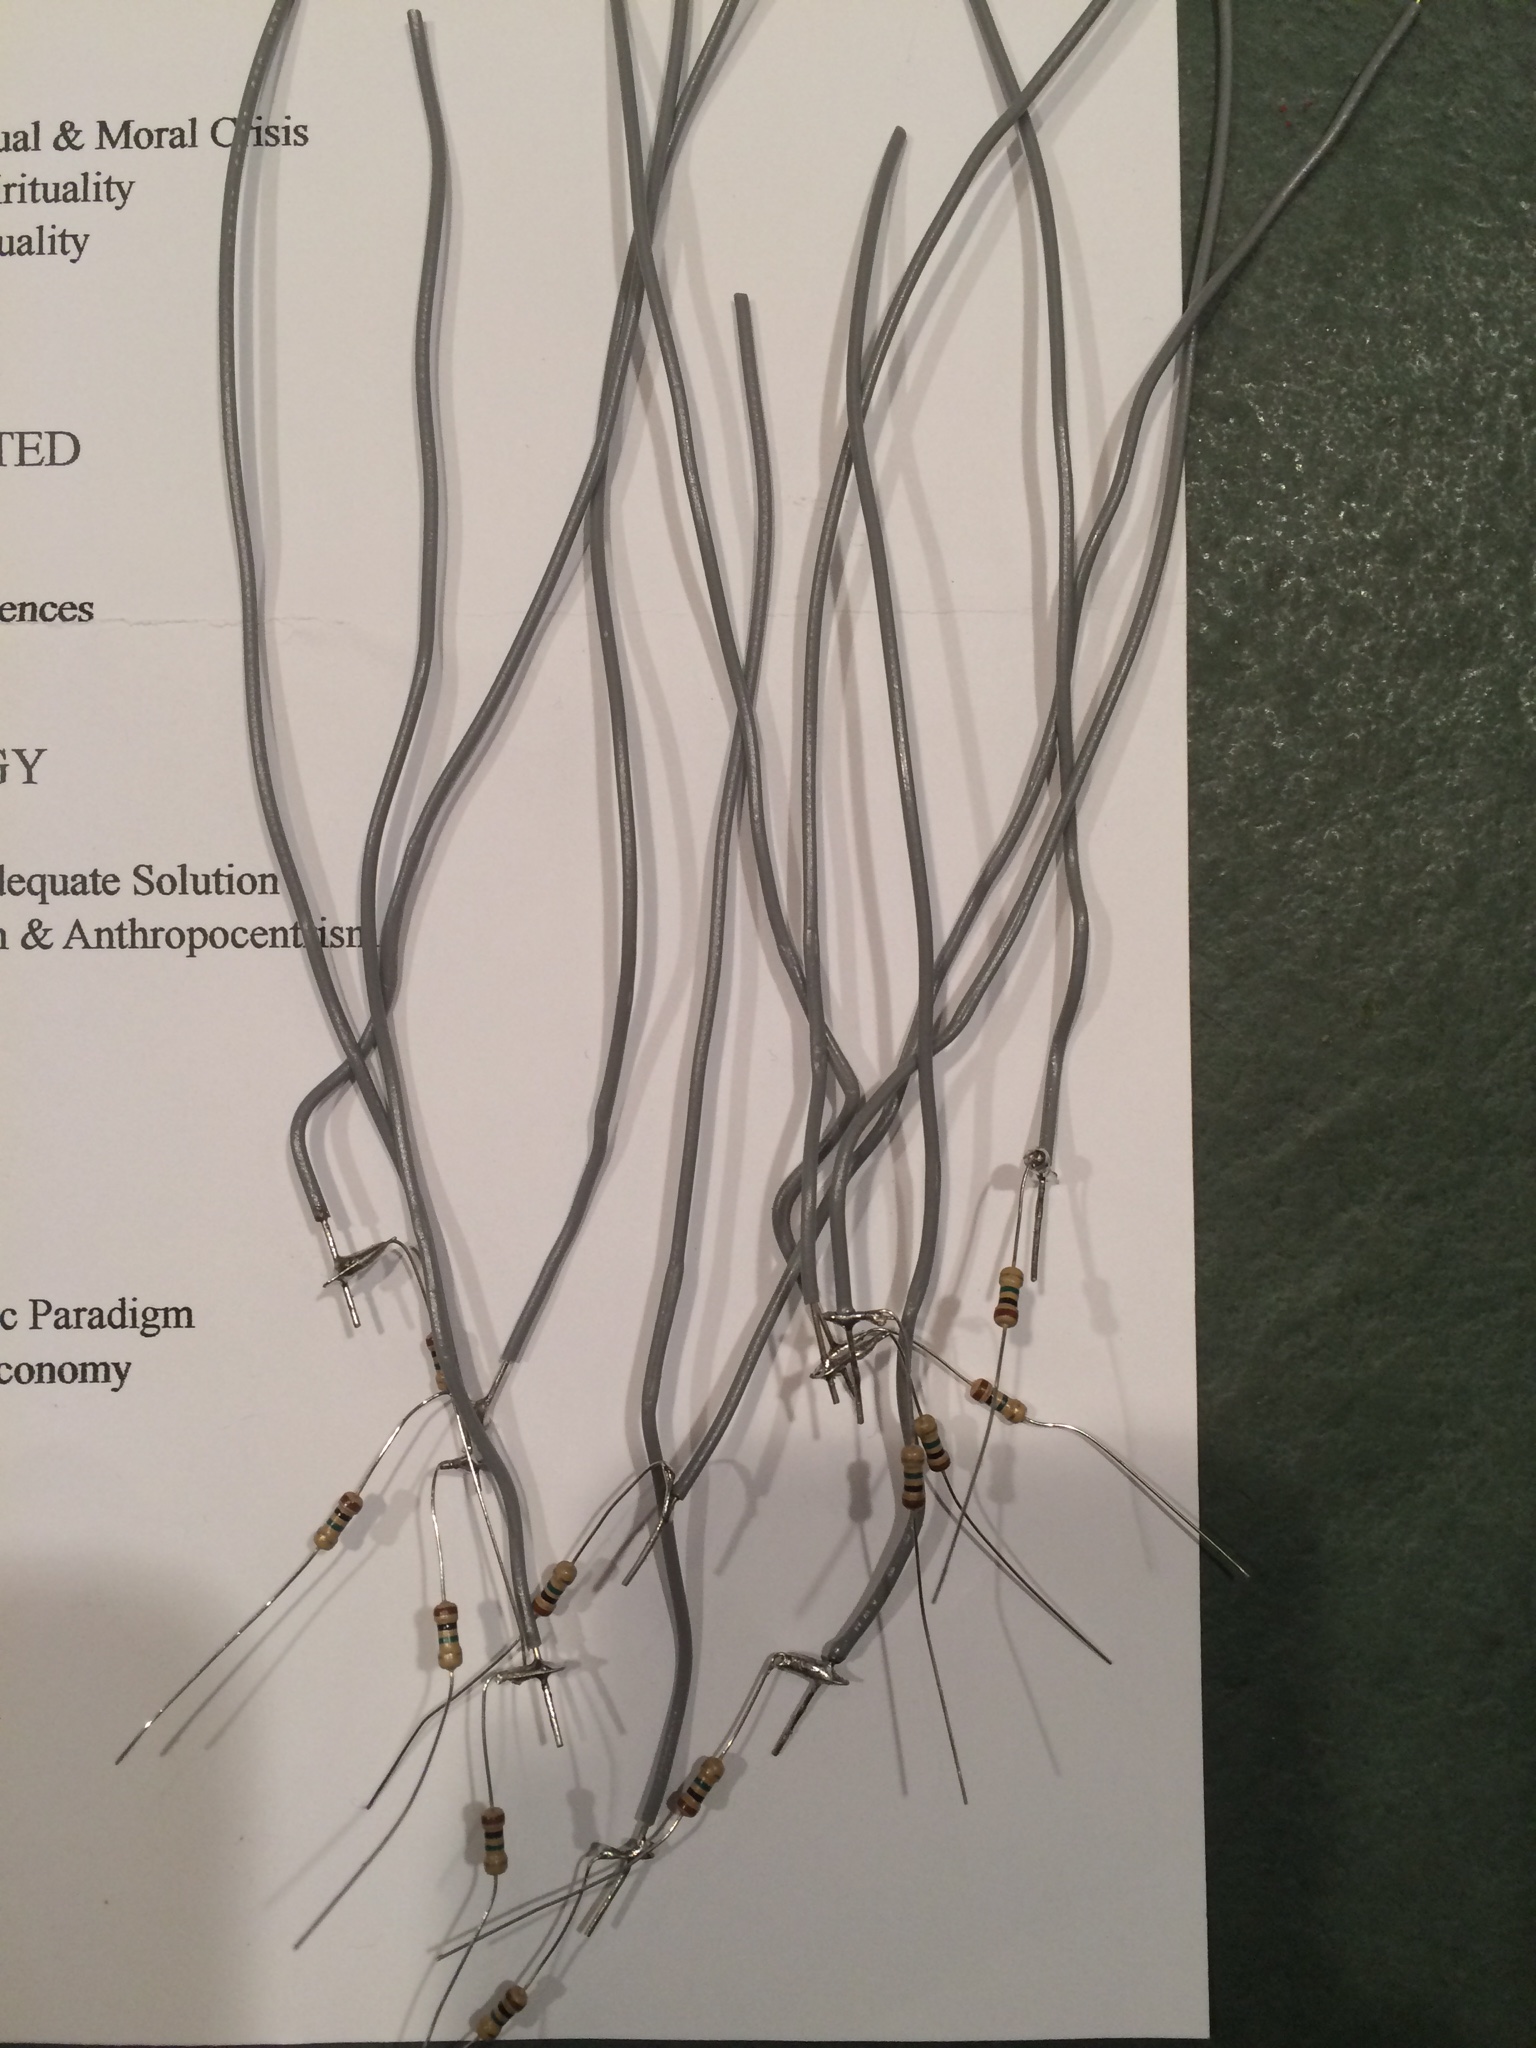
Each key has a 1 megohm resistor soldered directly to the key, and then two wires are soldered to each resistor— one wire connects to pin 4, and the other wire connects to whichever pin is the particular sensor pin.  This also applies to the pitch bend sensor.  In addition, there are two mini pushbuttons for the octave shifters and a 10K potentiometer that controls the midi velocity.

Here’s a brief description of how the code works.  I have included my code with all of my comments at the end of this report.

  • I establish the values for playnote (the threshold at which the capacitive sensor keys respond to touch), currentMidiVelocity, constrainedMidiVelocity, initial_octave, and mappedpitchbend.
  • I establish the pins that each octave shifter button is connected to (pins 17 and 18).
  • I establish the array of midi frequencies (C4 to B4) in the variable midifreqs[].
  • Using Arduino’s CapacitiveSensor library, I establish the digital pins that each key is connected to.  I also do this for the pitch bend sensor.
  • I establish the array capbuttons[], which contains the sensors for the keys.  It does not contain the pitch bend sensor.
  • I auto-calibrate the pitch bend sensor and the capbuttons array.  This generates a more consistent playnote value. I also set the octave shifter buttons to receive input.
  • I then proceed into my loop.  It acts in the following way: if one of the key sensors is pressed, a midi note on is sent with the following attributes:

-the value of the midi note is equivalent to the value of midifreqs at the position of capbuttons (ie. midifreqs[h], capbuttons[h]) plus the value of initial_octave

-the value of the velocity is equivalent to the value of constrainedMidiVelocity, which is determined by the constrained value of analogRead(5)

-the current Midi channel is set to channel 3.

  • After a delay of 1000 ms, a midi note off is then sent.
  • Next, I establish the octave shift buttons.  If the octave shift up button is pressed, the value of initial_octave increases by 12.  If the octave shift down button is pressed, the value of initial_octave will decrease by 12.
  • Finally, I establish my pitch bend sensor.  First, I map value of mappedpitchbend to the appropriate values.  Then, I establish that if the pitch bend sensor is pressed, I send a midi pitch bend to midi channel 3 with the value of mappedpitchbend.  If the sensor is not pressed, I send a midi pitch bend of 8192 to midi channel 3 (this is the equivalent of a pitch bend of 0 for the values I’ve mapped).

And that’s pretty much it!  If I built this project again, I would definitely build some kind of enclosure for the keys that would make the keyboard a bit more user-friendly.  I would also try to make it polyphonic.  Overall, even though building the hardware for it was definitely a bit more intensive than I’d originally anticipated, I had a great time making this final project.

Here’s the final code for my project:

#include <CapacitiveSensor.h>                                       // set up CapacitiveSensor library

int playnote = 3000;                                                // this is the point (threshold) at which the cap sensor responds to touch

int currentMidiVelocity = 0;                                        // setting the midi velocity
int constrainedMidiVelocity = 0;                                    // setting the constrained midi velocity
int currentMidiChannel = 3;                                         // setting the midi channel

int midifreqs[] = {60, 61, 62, 63, 64, 65, 66, 67, 68, 69, 70, 71}; // these are the frequencies from C3 to B3

int initial_octave = 0;                                             // establishing original value of initial_octave (important later on!)

int octaveupButton = 17;                                            // the octave up pushbutton is on pin 17
int octavedownButton = 18;                                          // the octave down pushbutton is on pin 18

int mappedpitchbend = 0;                                            // initialize value of mappedpitchbend (important later on!)

//////////////// CAPACITIVE SENSOR KEYS //////////////////////////////////////////////////////////////////////////////////////////////////

CapacitiveSensor   cs_4_2 = CapacitiveSensor(4,2);                  // 1M resistor between pins 4 & 2, pin 2 is sensor pin
CapacitiveSensor   cs_4_3 = CapacitiveSensor(4,3);                  // 1M resistor between pins 4 & 3, pin 3 is sensor pin
CapacitiveSensor   cs_4_5 = CapacitiveSensor(4,5);                  // 1M resistor between pins 4 & 5, pin 5 is sensor pin
CapacitiveSensor   cs_4_6 = CapacitiveSensor(4,6);                  // 1M resistor between pins 4 & 6, pin 6 is sensor pin
CapacitiveSensor   cs_4_7 = CapacitiveSensor(4,7);                  // 1M resistor between pins 4 & 7; pin 7 is sensor pin
CapacitiveSensor   cs_4_8 = CapacitiveSensor(4,8);                  // 1M resistor between pins 4 & 8; pin 8 is sensor pin
CapacitiveSensor   cs_4_9 = CapacitiveSensor(4,9);                  // 1M resistor between pins 4 & 9; pin 9 is sensor pin
CapacitiveSensor   cs_4_10 = CapacitiveSensor(4,10);                // 1M resistor between pins 4 & 10; pin 10 is sensor pin
CapacitiveSensor   cs_4_11 = CapacitiveSensor(4,11);                // 1M resistor between pins 4 & 11; pin 11 is sensor pin
CapacitiveSensor   cs_4_12 = CapacitiveSensor(4,12);                // 1M resistor between pins 4 & 12; pin 12 is sensor pin
CapacitiveSensor   cs_4_14 = CapacitiveSensor(4,14);                // 1M resistor between pins 4 & 15; pin 13 is sensor pin
CapacitiveSensor   cs_4_15 = CapacitiveSensor(4,15);                // 1M resistor between pins 4 & 16; pin 14 is sensor pin

CapacitiveSensor   pitch_bend = CapacitiveSensor(4,16);             // this is the pitch bend sensor

CapacitiveSensor capbuttons[] = {cs_4_2, cs_4_3, cs_4_5, cs_4_6, cs_4_7, cs_4_8, cs_4_9, cs_4_10, cs_4_11, cs_4_12, cs_4_14, cs_4_15}; // keys array

//////////////////////////////////////////////////////////////////////////////////////////////////////////////////////////////////////

void setup() { 

  for(int j=0; j <12; j++) {
    capbuttons[j].set_CS_AutocaL_Millis(0xFFFFFFFF);               // this autocalibrates the sensors (gives a more consistent playnote value)
   }
   for(int i=0; i<1; i++) {
   pitch_bend.set_CS_AutocaL_Millis(0xFFFFFFFF);                   // this autocalibrates the pitch bend sensor
   }

   Serial.begin(9600);                                            // baud rate -- not particularly important but good to know
   pinMode(octaveupButton, INPUT);                                // octave up button will receive input
   pinMode(octavedownButton, INPUT);                              // octave down button will receive input

}

//////////////////////////////////////////////////////////////////////////////////////////////////////////////////////////////////////

void loop() {

for (int h = 0; h<12; h++) {   if(capbuttons[h].capacitiveSensor(30) > playnote) {             // if the sensor reads a value greater than playnote (the threshold)
    currentMidiVelocity = analogRead(5);                          // read value of currentMidiVelocity from analog pin 5
    constrainedMidiVelocity = constrain(currentMidiVelocity, 0, 127);   // constrain the read from pin 5 to values from 0 to 127
    usbMIDI.sendNoteOn((midifreqs[h]+initial_octave), constrainedMidiVelocity, currentMidiChannel);   // send note on
    delay(1000);
    usbMIDI.sendNoteOff((midifreqs[h]+initial_octave), 0, currentMidiChannel);                        // send note off

//////////////////////////// OCTAVE SHIFTERS /////////////////////////////////////////////////////////////////////////////////////////

    if(digitalRead(octaveupButton) == HIGH) {                     // if octave up button is pressed
    initial_octave = (initial_octave+12);                         // value of initial_octave increases by 12
} 

    if(digitalRead(octavedownButton) == HIGH) {                   // if octave down button is pressed
    initial_octave = (initial_octave-12);                         // value of initial_octave decreases by 12
}

//////////////////////// PITCH BEND ///////////////////////////////////////////////////////////////////////////////////////////////

  mappedpitchbend = map(mappedpitchbend,6000, 9000, 0, 16000);    // this maps the pitchbend to the appropriate values

  if(pitch_bend.capacitiveSensor(30) > 500) {                     // if the sensor reads a value greater than 500
    usbMIDI.sendPitchBend(mappedpitchbend, currentMidiChannel);   // send the mapped pitch bend
  }  else{
    usbMIDI.sendPitchBend(8192, currentMidiChannel);              // send a pitch bend of 0 (halfway between 0 and 16,000)
  }
  }
}
//Serial.println(mappedpitchbend);                                // not entirely necessary, but good to have for debugging purposes
//Serial.println(constrainedMidiVelocity);                        // see comment above
//delay(500);
}

And here’s a video of it in action:

Final Project Update #3

Here goes the final update for my final project!  Unfortunately, it’s going to be a short one because my Teensy decided to stop responding to both USB and manual reboot settings, so a lot of this code is untested as of right now– I’m hoping to resolve this issue in class tomorrow so that I can check that everything’s actually done correctly.  The analog framework is pretty much the same, so i’m just going to post the code that I’ve been working on below.


#include <CapacitiveSensor.h>

CapacitiveSensor   cs_4_2 = CapacitiveSensor(4,2);        // 1M resistor between pins 4 & 2, pin 2 is sensor pin
CapacitiveSensor   cs_4_3 = CapacitiveSensor(4,3);        // 1M resistor between pins 4 & 3, pin 3 is sensor pin
CapacitiveSensor   cs_4_5 = CapacitiveSensor(4,5);        // 1M resistor between pins 4 & 5, pin 5 is sensor pin
CapacitiveSensor   cs_4_6 = CapacitiveSensor(4,6);        // 1M resistor between pins 4 & 6, pin 6 is sensor pin
CapacitiveSensor   cs_4_7 = CapacitiveSensor(4,7);        // 1M resistor between pins 4 & 7; pin 7 is sensor pin
CapacitiveSensor   cs_4_8 = CapacitiveSensor(4,8);        // 1M resistor between pins 4 & 8; pin 8 is sensor pin
CapacitiveSensor   cs_4_9 = CapacitiveSensor(4,9);        // 1M resistor between pins 4 & 9; pin 9 is sensor pin
CapacitiveSensor   cs_4_10 = CapacitiveSensor(4,10);      // 1M resistor between pins 4 & 10; pin 10 is sensor pin
CapacitiveSensor   cs_4_11 = CapacitiveSensor(4,11);      // 1M resistor between pins 4 & 11; pin 11 is sensor pin
CapacitiveSensor   cs_4_12 = CapacitiveSensor(4,12);      // 1M resistor between pins 4 & 12; pin 12 is sensor pin
CapacitiveSensor   cs_4_15 = CapacitiveSensor(4,15);      // 1M resistor between pins 4 & 13; pin 13 is sensor pin
CapacitiveSensor   cs_4_16 = CapacitiveSensor(4,16);      // 1M resistor between pins 4 & 14; pin 14 is sensor pin

CapacitiveSensor capbuttons[] = {cs_4_2, cs_4_3, cs_4_5, cs_4_6, cs_4_7, cs_4_8, cs_4_9, cs_4_10, cs_4_11, cs_4_12, cs_4_15, cs_4_16};

int playnote = 2000;
int currentMidiChannel = 3;
int midifreqs[] = {60, 61, 62, 63, 64, 65, 66, 67, 68, 69, 70, 71};
int currentMidiVelocity = 127;
int octave = 4;

int octaveup = 23;
bool octupstate = false;
bool lastoctupstate = false;

int octavedown = 22;
bool octdownstate = false;
bool lastoctdownstate = false;

int notes[] = {60, 61, 62, 63, 64, 65, 66, 67, 68, 69, 70, 71};
int buttons[] = {9,7,5,3};
bool states[] = {false,false,false,false,false,false,false,false,false,false,false,false};
bool lastStates[] = {false,false,false,false,false,false,false,false,false,false,false,false};

void setup() { 

   for(int j=0; j <12; j++) {
    capbuttons[j].set_CS_AutocaL_Millis(0xFFFFFFFF);
   }
   Serial.begin(9600);
   pinMode(octaveup, INPUT);
   pinMode(octavedown, INPUT);
}

void loop() {

  Serial.print(capbuttons[10].capacitiveSensor(30));
  Serial.print("\n");
  Serial.print(capbuttons[11].capacitiveSensor(30));
  delay(150);

playMidi();
shiftoctaveup();
shiftoctavedown();
playSynthNotes();
}

void playMidi() {
for (int h = 0; h<12; h++) {   if(capbuttons[h].capacitiveSensor(30) > playnote) {
    usbMIDI.sendNoteOn(midifreqs[h], currentMidiVelocity, currentMidiChannel);
    delay(500);
    usbMIDI.sendNoteOff(midifreqs[h], 0, currentMidiChannel);
    delay(500);
  }
}
}  

void shiftoctaveup() {

  lastoctupstate = octupstate;
  octupstate = digitalRead(octaveup);

  for(int k = 0; k<12; k++) {     if(lastoctupstate == LOW && octupstate == HIGH && (capbuttons[k].capacitiveSensor(30) > playnote)) {
      usbMIDI.sendNoteOn(midifreqs[k+12], currentMidiVelocity, currentMidiChannel);
  } else if(lastoctupstate == HIGH && octupstate == LOW) {
      usbMIDI.sendNoteOff(midifreqs[k+12], 0, currentMidiChannel);
  }
}
}

void shiftoctavedown() {

  lastoctdownstate = octdownstate;
  octdownstate = digitalRead(octavedown);

  for(int x = 0; x<12; x++) {     if(lastoctdownstate == LOW && octdownstate == HIGH && (capbuttons[x].capacitiveSensor(30) > playnote)) {
      usbMIDI.sendNoteOn(midifreqs[x-12], currentMidiVelocity, currentMidiChannel);
  } else if(lastoctdownstate == HIGH && octupstate == LOW) {
      usbMIDI.sendNoteOff(midifreqs[x-12], 0, currentMidiChannel);
    }
  }
}

void playSynthNotes(int q) {
 lastStates[q] = states[q];
 states[q] = digitalRead(buttons[q]);

 if(lastStates[q] == LOW && states[q] == HIGH) {
//  usbMIDI.sendNoteOn(notes[q], 127, midiChannel) // placeholder
 } else if(lastStates[q] == HIGH && states[q] == LOW) {
//  usbMIDI.sendNoteOff(notes[q], 0, midiChannel); // placeholder
 }

}

// note: re-solder resistor/copper combo #11, might have fried the resistor.

Final Project Update #2

Here we are at Update #2: I’ve definitely made a lot of progress since last week.  I’ll update in two stages: analog wiring and code.

Analog:

I’m pretty much finished wiring everything, with the exception of creating & wiring the octave shift button.  I’ve attached a picture below.  For some reason, the last two buttons (11 and 12) aren’t working, and I suspect it’s because they’re the only two pins that are not on the left side of the Teensy (in other words, pins 1 to 12).  I tried moving them to the touch pins on the other side, but that hasn’t seemed to work either.  The plot thickens…

IMG_2460.JPG.jpeg

Coding:

My code right now is a bit of a mess, because I hate working with arrays, but the important part is that it works! (Give my creation life!)  Again, the exceptions to this are keys 11 and 12, but I know those aren’t working because of the wiring (I double checked this in Serial and the Arduino Help Site), not because of the code.  I’ve attached a video and my code below.  There’s also a delay on some of the keys that I’m not sure how to fix, but again, this might be primarily because I’m not using an array.  I will definitely be working on this in class tomorrow. Sorry for the (somewhat) crappy video quality:

#include <CapacitiveSensor.h>

CapacitiveSensor   cs_4_2 = CapacitiveSensor(4,2);        // 1M resistor between pins 4 & 2, pin 2 is sensor pin
CapacitiveSensor   cs_4_3 = CapacitiveSensor(4,3);        // 1M resistor between pins 4 & 3, pin 3 is sensor pin
CapacitiveSensor   cs_4_5 = CapacitiveSensor(4,5);        // 1M resistor between pins 4 & 5, pin 5 is sensor pin
CapacitiveSensor   cs_4_6 = CapacitiveSensor(4,6);        // 1M resistor between pins 4 & 6, pin 6 is sensor pin
CapacitiveSensor   cs_4_7 = CapacitiveSensor(4,7);        // 1M resistor between pins 4 & 7; pin 7 is sensor pin
CapacitiveSensor   cs_4_8 = CapacitiveSensor(4,8);        // 1M resistor between pins 4 & 8; pin 8 is sensor pin
CapacitiveSensor   cs_4_9 = CapacitiveSensor(4,9);        // 1M resistor between pins 4 & 9; pin 9 is sensor pin
CapacitiveSensor   cs_4_10 = CapacitiveSensor(4,10);      // 1M resistor between pins 4 & 10; pin 10 is sensor pin
CapacitiveSensor   cs_4_11 = CapacitiveSensor(4,11);      // 1M resistor between pins 4 & 11; pin 11 is sensor pin
CapacitiveSensor   cs_4_12 = CapacitiveSensor(4,12);      // 1M resistor between pins 4 & 12; pin 12 is sensor pin
CapacitiveSensor   cs_4_15 = CapacitiveSensor(4,13);      // 1M resistor between pins 4 & 13; pin 13 is sensor pin
CapacitiveSensor   cs_4_16 = CapacitiveSensor(4,14);      // 1M resistor between pins 4 & 14; pin 14 is sensor pin

CapacitiveSensor capbuttons[] = {cs_4_2, cs_4_3, cs_4_5, cs_4_6, cs_4_7, cs_4_8, cs_4_9, cs_4_10, cs_4_11, cs_4_12, cs_4_15, cs_4_16};

int playnote = 3000;
int currentMidiChannel = 3;
int midifreqs[] = {60, 61, 62, 63, 64, 65, 66, 67, 68, 69, 70, 71};
int currentMidiVelocity = 127;

void setup() { 

   for(int j=0; j <12; j++) {     capbuttons[j].set_CS_AutocaL_Millis(0xFFFFFFFF);    }    Serial.begin(9600); } void loop() {   int midi0 = midifreqs[0];   int midi1 = midifreqs[1];   int midi2 = midifreqs[2];   int midi3 = midifreqs[3];   int midi4 = midifreqs[4];   int midi5 = midifreqs[5];   int midi6 = midifreqs[6];   int midi7 = midifreqs[7];   int midi8 = midifreqs[8];   int midi9 = midifreqs[9];   int midi10 = midifreqs[10];   int midi11 = midifreqs[11];    if(capbuttons[0].capacitiveSensor(30) > playnote) {
  usbMIDI.sendNoteOn(midi0, currentMidiVelocity, currentMidiChannel);
   delay(500);
   usbMIDI.sendNoteOff(midi0, 0, currentMidiChannel);
   delay(500);}
else if(capbuttons[1].capacitiveSensor(30) > playnote) {
  usbMIDI.sendNoteOn(midi1, currentMidiVelocity, currentMidiChannel);
   delay(500);
   usbMIDI.sendNoteOff(midi1, 0, currentMidiChannel);
   delay(500);}
else if(capbuttons[2].capacitiveSensor(30) > playnote) {
  usbMIDI.sendNoteOn(midi2, currentMidiVelocity, currentMidiChannel);
   delay(500);
   usbMIDI.sendNoteOff(midi2, 0, currentMidiChannel);
   delay(500);}
else if(capbuttons[3].capacitiveSensor(30) > playnote) {
  usbMIDI.sendNoteOn(midi3, currentMidiVelocity, currentMidiChannel);
   delay(500);
   usbMIDI.sendNoteOff(midi3, 0, currentMidiChannel);
   delay(500);}
else if(capbuttons[4].capacitiveSensor(30) > playnote) {
  usbMIDI.sendNoteOn(midi4, currentMidiVelocity, currentMidiChannel);
   delay(500);
   usbMIDI.sendNoteOff(midi4, 0, currentMidiChannel);
   delay(500);}
else if(capbuttons[5].capacitiveSensor(30) > playnote) {
  usbMIDI.sendNoteOn(midi5, currentMidiVelocity, currentMidiChannel);
   delay(500);
   usbMIDI.sendNoteOff(midi5, 0, currentMidiChannel);
   delay(500);}
else if(capbuttons[6].capacitiveSensor(30) > playnote) {
  usbMIDI.sendNoteOn(midi6, currentMidiVelocity, currentMidiChannel);
   delay(500);
   usbMIDI.sendNoteOff(midi6, 0, currentMidiChannel);
   delay(500);}
else if(capbuttons[7].capacitiveSensor(30) > playnote) {
  usbMIDI.sendNoteOn(midi7, currentMidiVelocity, currentMidiChannel);
   delay(500);
   usbMIDI.sendNoteOff(midi7, 0, currentMidiChannel);
   delay(500);}
else if(capbuttons[8].capacitiveSensor(30) > playnote) {
  usbMIDI.sendNoteOn(midi8, currentMidiVelocity, currentMidiChannel);
   delay(500);
   usbMIDI.sendNoteOff(midi8, 0, currentMidiChannel);
   delay(500);}
else if(capbuttons[9].capacitiveSensor(30) > playnote) {
  usbMIDI.sendNoteOn(midi9, currentMidiVelocity, currentMidiChannel);
   delay(500);
   usbMIDI.sendNoteOff(midi9, 0, currentMidiChannel);
   delay(500);}
else if(capbuttons[10].capacitiveSensor(30) > playnote) {
  usbMIDI.sendNoteOn(midi10, currentMidiVelocity, currentMidiChannel);
   delay(500);
   usbMIDI.sendNoteOff(midi10, 0, currentMidiChannel);
   delay(500);}
else if(capbuttons[11].capacitiveSensor(30) > playnote) {
  usbMIDI.sendNoteOn(midi11, currentMidiVelocity, currentMidiChannel);
   delay(500);
   usbMIDI.sendNoteOff(midi3, 0, currentMidiChannel);
   delay(500);}

    }

//if x sensor > value determined by touch sensor then
//usbMidi.sendNoteOn((currentmidiindex + (octave number * 12)), 127, 3)

What’s Next?

Integrating this with the analog circuit!  Definitely something I don’t know how to tackle by myself, so I’ll be working on this in class tomorrow for sure.   The analog circuit is already all built and ready to go- i think i’m going to leave off on the reverb circuit for now, though, unless I have some sudden breakthrough and manage to complete everything else really quickly.

**Update: managed to fix that delay on the keys — I had the value of playnote up too high.

Final Project Update #1

Since my project (a touch-capacitive keyboard that’s going to play MIDI notes as well as interface with an analog synthesizer) is essentially a combination of analog and digital components, I’m going to break this update into two parts: Analog and Digital.

Analog – Tasks Accomplished
*recreated the analog monophonic synthesizer that I made for my Analog Final Project, minus the LED circuit and the buttons that served as keys.
*put together my touch-capacitive keyboard using copper tape
*soldered resistors to wires that will connect the “keys” to the actual breadboard
*started building my reverb amplifier circuit — I may or may not wind up using this in the Final Project, depending on how much time it takes for me to get everything else finished, but ideally I’d like to include it.

IMG_2449.JPG.jpeg

IMG_2448.JPG.jpegIMG_2447.JPG.jpeg

Digital- Tasks Accomplished
*imported the Capacitive Sensor library to Arduino and began working with it
*established the output pins that will correspond to each sensor “key”
*established an array (mytotals[]) that takes samples of the state of each key
*developed pseudo-code for setting up the for loop that will provide a MIDI note on when the keys are touched

Tasks to Do — Analog and Digital
*develop and expand pseudo-code for the for loop into functioning code
*solder the resistor-wire combination to the copper tape and connect it to breadboard, then run the Serial port to determine what the ‘on’ and ‘off’ values of the “keys” are
*incorporate these values into the code
*begin work on the digital octave shifter and set up an appropriate button for this on the analog interface
*finally: begin work on connecting the analog synth to the digital touch capacitive keys — ideally I will have all of the different components of the digital aspect (octave shifter etc.) finished before I begin work on this.

Digital Lab #9

Part 1:

The playNote() function essentially works this way: its first action is to set the timestep of the variable stepsforNote.  In the way that this function is set up, stepsforNote has a timestep (in microseconds) that corresponds to the frequency that’s stored in the variable currentFrequency (initially set at 261, or middle C).  Next, we increment OscCounter so that if the program has gone through the total amount of time steps, we reset the counter.  If the value of oscState, established earlier as HIGH, is in fact HIGH, we write the oscillator pin as LOW and switch the oscState variable to LOW.  If the variable oscState is LOW, we write the oscillator pin as HIGH and switch the oscState value to HIGH.

Part 2A, B, & C:

And here’s the accompanying code:

IntervalTimer oscTimer;                   // oscTimer object
volatile int oscPin = 13;                  // oscillator pin

int led1Pin = 9;                          // leds
int led2Pin = 10;
int led3Pin = 11;
int led4Pin = 8;
int buttonPin = 4;

int numSteps = 4;
int tempo = 300;                          // beats per minute
volatile int currentFrequency = 261;      // freq to play
volatile int oscCounter = 0;
volatile int oscState = HIGH;

void setup() {
  pinMode(oscPin, OUTPUT);
  pinMode(led1Pin, OUTPUT);
  pinMode(led2Pin, OUTPUT);
  pinMode(led3Pin, OUTPUT);
  pinMode(led4Pin, OUTPUT);
  pinMode(buttonPin, INPUT);

  Serial.begin(9600);

  oscTimer.begin(playNote, 1);       // call playnote() every 1 microsecond
}

void loop() {
  tempo = 50 + analogRead(4);
  int buttonRead = digitalRead(4);
  if(buttonRead == 1) {
    for(int i= numSteps - 1; i >= 0; i--) {     // for each step
      setCurrentStep(i);                // call setCurrentStep(step)
      delay(tempo);
      Serial.println(i);
    }

  }

  else {
     for(int i=0; i<numSteps; i++) {     // for each step       setCurrentStep(i);                // call setCurrentStep(step)       delay(tempo);                     // delay by tempo in milliseconds     }     Serial.println(buttonRead);   }   } //}     void setCurrentStep(int stepNum) {    // takes a step number & calls another function   setCurrentLed(stepNum);             // set the LED for this step   setTone(stepNum);                   // play tone for the step } void setTone(int stepNum) {           // if stepnum = 1, read from pin 3, etc.   int currentPotVal;   if(stepNum == 0) {     currentPotVal = analogRead(3);   }   if(stepNum == 1) {     currentPotVal = analogRead(2);   }   if(stepNum == 2) {     currentPotVal = analogRead(1);   }   if(stepNum == 3) {     currentPotVal = analogRead(0);   }     currentFrequency = 50 + currentPotVal; }   void setCurrentLed(int stepNum) {            turnOffAllLeds();               // turn off al leds   turnOnLed(stepNum);             // turn LED on for this step }   void turnOnLed(int stepNum) {     // turn on the led   if(stepNum == 0) {              // that corresponds to the argument stepNum     digitalWrite(led1Pin, HIGH);   }   else if(stepNum == 1) {     digitalWrite(led2Pin, HIGH);   }   else if(stepNum == 2) {     digitalWrite(led3Pin, HIGH);   }   else if(stepNum == 3) {     digitalWrite(led4Pin, HIGH);   } }   void turnOffAllLeds() {             // turn of every LED manually   digitalWrite(led1Pin, LOW);   digitalWrite(led2Pin, LOW);   digitalWrite(led3Pin, LOW);   digitalWrite(led4Pin, LOW); }   void playNote() {     volatile int stepsForNote = 1000000 / currentFrequency / 2;  //stepsforNote has microseconds (time step) corresponding to the frequency that's stored   //in variable currentFrequency // ex. 1000 Hz ==> 500 stepsForNote

  oscCounter++;                      // increment oscCounter
  if(oscCounter >= stepsForNote) {   // if we have gone the total amount of time steps,
    oscCounter = 0;                  // we reset the counter
  }
  if(oscCounter == 0) {

    if(oscState == HIGH) {
      digitalWrite(oscPin, LOW);
      oscState = LOW;
    }
    else if(oscState == LOW) {
      digitalWrite(oscPin, HIGH);
      oscState = HIGH;
    }
  }
}

Part 3:

And here’s the accompanying code:

IntervalTimer oscTimer;                   // oscTimer object
volatile int oscPin = 13;                  // oscillator pin

int led1Pin = 9;                          // leds
int led2Pin = 10;
int led3Pin = 11;
int led4Pin = 8;
int buttonPin = 4;

int midiNote = 0;
int midiChannel = 3;

int numSteps = 4;
int tempo = 300;                          // beats per minute
volatile int currentFrequency = 261;      // freq to play
volatile int oscCounter = 0;
volatile int oscState = HIGH;

void setup() {
  pinMode(oscPin, OUTPUT);
  pinMode(led1Pin, OUTPUT);
  pinMode(led2Pin, OUTPUT);
  pinMode(led3Pin, OUTPUT);
  pinMode(led4Pin, OUTPUT);
  pinMode(buttonPin, INPUT);

  Serial.begin(9600);

  oscTimer.begin(playNote, 1);       // call playnote() every 1 microsecond
}

void loop() {
  tempo = 50 + analogRead(4);
  //for(int k = 0; k < 200; k++) {     //Serial.println(k);    // delay(50);    // if(k >=100) {
    //  return;
  //  }
  //}

  int buttonRead = digitalRead(4);
  if(buttonRead == 1) {
    for(int i= numSteps - 1; i >= 0; i--) {     // for each step
      setCurrentStep(i);                // call setCurrentStep(step)
      delay(tempo);
      Serial.println(i);
    }

  }

  else {
     for(int i=0; i<numSteps; i++) {     // for each step       setCurrentStep(i);                // call setCurrentStep(step)       delay(tempo);                     // delay by tempo in milliseconds     }     Serial.println(buttonRead);   }   } //}     void setCurrentStep(int stepNum) {    // takes a step number & calls another function   setCurrentLed(stepNum);             // set the LED for this step   setTone(stepNum);                   // play tone for the step } void setTone(int stepNum) {           // if stepnum = 1, read from pin 3, etc.   int currentPotVal;   if(stepNum == 0) {     currentPotVal = 100;     midiNote = 60;        }   if(stepNum == 1) {     currentPotVal = 200;     midiNote = 63;   }   if(stepNum == 2) {     currentPotVal = 400;     midiNote = 64;   }   if(stepNum == 3) {     currentPotVal = analogRead(0);     midiNote = 66;   }     currentFrequency = 50 + currentPotVal;   usbMIDI.sendNoteOn(midiNote, 127, midiChannel); }   void setCurrentLed(int stepNum) {            turnOffAllLeds();               // turn off al leds   turnOnLed(stepNum);             // turn LED on for this step }   void turnOnLed(int stepNum) {     // turn on the led   if(stepNum == 0) {              // that corresponds to the argument stepNum     digitalWrite(led1Pin, HIGH);   }   else if(stepNum == 1) {     digitalWrite(led2Pin, HIGH);   }   else if(stepNum == 2) {     digitalWrite(led3Pin, HIGH);   }   else if(stepNum == 3) {     digitalWrite(led4Pin, HIGH);   } }   void turnOffAllLeds() {             // turn of every LED manually   digitalWrite(led1Pin, LOW);   digitalWrite(led2Pin, LOW);   digitalWrite(led3Pin, LOW);   digitalWrite(led4Pin, LOW);   usbMIDI.sendNoteOff(midiNote, 0, midiChannel);   usbMIDI.sendNoteOff(midiNote, 0, midiChannel);   usbMIDI.sendNoteOff(midiNote, 0, midiChannel);   usbMIDI.sendNoteOff(midiNote, 0, midiChannel); }   void playNote() {     volatile int stepsForNote = 1000000 / currentFrequency / 2;  //stepsforNote has microseconds (time step) corresponding to the frequency that's stored   //in variable currentFrequency // ex. 1000 Hz ==> 500 stepsForNote

  oscCounter++;                      // increment oscCounter
  if(oscCounter >= stepsForNote) {   // if we have gone the total amount of time steps,
    oscCounter = 0;                  // we reset the counter
  }
  if(oscCounter == 0) {

    if(oscState == HIGH) {
      digitalWrite(oscPin, LOW);
      oscState = LOW;
    }
    else if(oscState == LOW) {
      digitalWrite(oscPin, HIGH);
      oscState = HIGH;
    }
  }
}

Part 3a:

Two features that I think I could potentially add to make this step sequencer more interesting are: first, a button that, when pressed, would make the sequencer skip a particular note; and second, a potentiometer/knob that would control the volume of each note in the audio version of this and the velocity of each note in the MIDI version.

Part 3b:

Two features that would be cool to add, but I don’t think I have the skill level to make myself, are: first,  buttons storing different pattern presets that would change the pattern preset when pressed; and second, incorporating different sounds besides the MIDI keyboard into the sequence played.

Part 4:

For my final project, I’ve chosen to build a touch-capacitive keyboard that will interact in two different ways: first, it will interact with Teensy & Arduino to serve as a MIDI controller; and second, it will interact with an analog synthesizer (clavioline) to essentially replace the keyboard of manual pushbuttons.

Ideally, I am also aiming to put in an octave shifter and pitch bend feature for the MIDI keyboard component– if I have time, I’d also add an octave shifter and pitch bend knob to the analog synth.

Here’s my drawing of the physical interface of my project:

EPSON002.JPG

Digital Lab #8


int cButton = 9;                // c button is pin 9
int cMidiNote = 60;             // constant midi note value
bool cButtonState = false;      // current state of the c button
bool lastCButtonState = false;  // last state of the c button

// int notes[] = {60,62,64,65};
// int buttons[] = {9,7,5,3};
// bool states[] = {false,false,false,false};
// bool lastStates[] = {false,false,false,false};

int dButton = 7;
int dMidiNote = 62;
bool dButtonState = false;
bool lastdButtonState = false;

int eButton = 5;
int eMidiNote = 64;
bool eButtonState = false;
bool lasteButtonState = false;

int fButton = 3;
int fMidiNote = 65;
bool fButtonState = false;
bool lastfButtonState = false;

int midiChannel = 1;            // the midi channel

void setup() {
  pinMode(cButton, INPUT);      // sets the c button for input
  pinMode(dButton, INPUT);      // sets the d button for input
  pinMode(eButton, INPUT);      // sets the e button for input
  pinMode(fButton, INPUT);      // sets the f button for input
}

void loop() {      

  checkC();                     // calls the checkC() function
  checkD();                     // calls the checkD() function
  checkE();                     // calls the checkE() function
  checkF();                     // calls the checkF() function
}

void checkC() {                 

  lastCButtonState = cButtonState;
  cButtonState = digitalRead(cButton);  

  if (lastCButtonState == LOW && cButtonState == HIGH) {
    usbMIDI.sendNoteOn(cMidiNote, 127, midiChannel);
  } else if (lastCButtonState == HIGH && cButtonState == LOW) {
    usbMIDI.sendNoteOff(cMidiNote, 0, midiChannel);
  }
}

void checkD() {

  lastdButtonState = dButtonState;                              // the last state must be saved before overwriting
  dButtonState = digitalRead(dButton);                          // the dButton state variable

                                                                // state change: dButtonstate and lastdButtonState are not equal 

                                                                // a state change occurs when there is a different state from the
                                                                // last one, whether or not the button is pressed.

  if (lastdButtonState == LOW && dButtonState == HIGH) {        // the first time we enter the function after we press the button...
    usbMIDI.sendNoteOn(dMidiNote, 127, midiChannel);            // ...we send a noteon message.
  } else if (lastdButtonState == HIGH && dButtonState == LOW) { // the first time we enter the function after we release the button...
    usbMIDI.sendNoteOff(dMidiNote, 0, midiChannel);             // ...we send a noteoff (ie. noteon with zero velocity) message.
  }

}

void checkE() {

  lasteButtonState = eButtonState;
  eButtonState = digitalRead(eButton);

  if (lasteButtonState == LOW && eButtonState == HIGH) {
    usbMIDI.sendNoteOn(eMidiNote, 127, midiChannel);
  } else if (lasteButtonState == HIGH && eButtonState == LOW) {
    usbMIDI.sendNoteOff(eMidiNote, 0, midiChannel);
  }

}

void checkF() {

  lastfButtonState = fButtonState;
  fButtonState = digitalRead(fButton);

  if (lastfButtonState == LOW && fButtonState == HIGH) {
    usbMIDI.sendNoteOn(fMidiNote, 127, midiChannel);
  } else if (lastfButtonState == HIGH && fButtonState == LOW) {
    usbMIDI.sendNoteOff(fMidiNote, 0, midiChannel);
  }

}


Part 2:

I am a little bit stuck on what I want to build for this project, mainly because there are so many different options as to what I can build.  So far, my main idea is a touch sensitive capacitive keyboard.  I’m working on building a clavioline (a slightly different form of a standard analog synth) and I wonder if I could combine that with a touch sensitive keyboard that I could use to play the clavioline.  Otherwise, I’m not entirely sure if a touch-sensitive capacitive keyboard is enough of a stand-alone digital project.

Another interesting thing to do would possibly be to see if I could use light and color to control a MIDI note (ie. green = C, red = D, etc.).

Digital Lab #7

Part 2A: “Integrate this with any of the squarewave synth tone generating code we’ve done in class before, so that the sensor will control a tone that can glide from two octaves below middle C to one octave above middle C. ”


int oscillatorPin = 13;
int freqbuttonPin = 7;
int led1 = 10; // the LED is essentially a placeholder in this code

int sensorval = 0;
int mappedsensorval = 0;

void setup() {
  Serial.begin(9600);
  pinMode(oscillatorPin, OUTPUT);
  pinMode(led1, OUTPUT);
  pinMode(freqbuttonPin, INPUT);

}

void loop() {

    if(digitalRead(freqbuttonPin) == HIGH) {
      while(digitalRead(freqbuttonPin) == HIGH) {
        sensorval = analogRead(7); // this establishes that values are coming in from the sensor on pin 7
        mappedsensorval = map(sensorval, 5, 300, 65, 770); // these values are for the room i was working in
        Serial.println("hello");

        playFrequency(mappedsensorval); }

    } if(digitalRead(freqbuttonPin) == LOW) {
    while(digitalRead(freqbuttonPin) == LOW) {
      for(int count = 0; count <5; count++) {
        blinkLED(led1, count * 100);

      }
    }
    }
    }

void playFrequency(int freq) {
   digitalWrite(oscillatorPin, HIGH);
   delayMicroseconds(1000000 / freq / 2);
   digitalWrite(oscillatorPin, LOW);
   delayMicroseconds(1000000 / freq / 2);
}

void blinkLED(int blinkPin, int howlong) { // again, this function is essentially a placeholder.
  digitalWrite(blinkPin, HIGH);            // i chose not to keep it because of the potential effect
  delay(howlong);                          // that the LED could have on the photocell.
  digitalWrite(blinkPin, LOW);
  delay(howlong);
}


Part 2B (1):  “Integrate this with any of your Midi Out code so you can use a photocell to control a Midi note being sent to Max or any other DAW. ”


int oscillatorPin = 13; // this is essentially a placeholder
int freqbuttonPin = 7;
int led1 = 10;

int sensorval = 0; // this is the photocell

int currentMidiChannel = 3;
int currentMidiNote = 0;
int currentMidiVelocity = 127;

void setup() {
pinMode(oscillatorPin, OUTPUT);
pinMode(led1, OUTPUT);
pinMode(freqbuttonPin, INPUT);

}

void loop() {
  if(digitalRead(freqbuttonPin) == HIGH) { // ie. if the button is pressed
    sensorval = analogRead(7);
    currentMidiNote = sensorval/4; // this makes the MIDI note outputted correspond to the value of the photocell

    digitalWrite(led1, HIGH);
    usbMIDI.sendNoteOn(currentMidiNote, currentMidiVelocity, currentMidiChannel);
    delay(500);
    digitalWrite(led1, LOW);
    usbMIDI.sendNoteOff(currentMidiNote, 0, currentMidiChannel);
    delay(500);

    }else if(digitalRead(freqbuttonPin) == LOW) { // ie. if the button isn't pressed
        digitalWrite(led1, LOW);
    }
}

Part 2B(2): “Then add a second photo cell so you can either 1) only trigger a Midi note when it is sufficiently dark.”


int oscillatorPin = 13; // essentially a placeholder
int freqbuttonPin = 7;
int led1 = 10; // also essentially a placeholder

int sensorval = 0; // this is the photocell that controls pitch
int sensor2val = 0; // this is the photocell that triggers the MIDI note depending on darkness

int currentMidiChannel = 3;
int currentMidiNote = 0;
int currentMidiVelocity = 127;

void setup() {
pinMode(oscillatorPin, OUTPUT);
pinMode(led1, OUTPUT);
pinMode(freqbuttonPin, INPUT);

}

void loop() {
  if(digitalRead(freqbuttonPin) == HIGH) { // ie. if the button is pressed
    sensorval = analogRead(7);
    currentMidiNote = sensorval/4;
    sensor2val = analogRead(2); // 

    if(sensor2val < 200) { // if the value of the photocell is less than 200
    digitalWrite(led1, HIGH);
    usbMIDI.sendNoteOn(currentMidiNote, currentMidiVelocity, currentMidiChannel);
    delay(500);
    digitalWrite(led1, LOW);
    usbMIDI.sendNoteOff(currentMidiNote, 0, currentMidiChannel);
    delay(500);
    }

    }else if(digitalRead(freqbuttonPin) == LOW) { // ie. if the button is not pressed
        digitalWrite(led1, LOW);
    }
}

Digital Lab #6

The code given to us in class essentially does the following:

  • sends a value to the digital pot
  • uses SPI.transfer to transfer a 0 and then the value to the digital pot
  • creates a counter loop that counts from 0 to 127 quickly- more specifically, it ramps up the value stored in the digital pot and then sends the value back down to 0
  • uses a delay that reads the value of an analog pot to control the speed of how quickly or slowly the counter sends the value 0 to 127.

Here’s my code, which includes the attack, sustain, and decay operations.

#include <SPI.h>

IntervalTimer oscTimer; // IntervalTimer object

int buttonPin = 7; // button on pin 7
int oscillatorPin = 8; // oscillator on pin 8
int slaveSelectPin = 10; // CS 10

boolean ledState = LOW; // ledState
int digipotHighestStep = 127; // highest value for digital pot
int attackVal = 0; // initialize attackVal
int decayVal = 0; // initialize decayVal
int sustainVal = 0; // initialize sustainVal

void setup() {
  pinMode(oscillatorPin, OUTPUT);
  pinMode(buttonPin, INPUT);
  pinMode(slaveSelectPin, OUTPUT);

  SPI.begin();
  digitalWrite(slaveSelectPin, HIGH);  // put the wal up
  digitalPotWrite(0);

  //don't mess with this, just leave it
  oscTimer.begin(playNote, 1000000/261/2); // million/frequency/2 for half of the period
}

void loop() {

    attackVal = analogRead(0); // attack from Analog 0
    for(int i=0; i<=digipotHighestStep; i++) { // 0 - 127
      attackVal = analogRead(0);    // read the attack
      digitalPotWrite(i);           // set the pot
      delay(attackVal/20);        // delay by attackval / 50 milliseconds
    }

    sustainVal = analogRead(8); // sustain from Analog 8
    for(int i=0; i<=digipotHighestStep; i++) { // 0 - 127        analogRead(8); // read the sustain        digitalPotWrite(digipotHighestStep); // set the pot        delay(sustainVal/20);  // delay by sustainVal / 20 milliseconds       }          decayVal = analogRead(2); // decay from Analog 2     for(int j=digipotHighestStep; j>=0; j--) {  // 0 - 127
      decayVal = analogRead(2); // read the decay
      digitalPotWrite(j); // set the pot
      delay(decayVal/20); // delay by decayVal / 20 milliseconds
    }
}

void digitalPotWrite(int val) {
  digitalWrite(slaveSelectPin, LOW); // ie. wall is down
  SPI.transfer(0); //transfer information
  SPI.transfer(val);
  digitalWrite(slaveSelectPin, HIGH); // ie. wall is up
}

//this is for the oscillator. don't touch this function.
void playNote() {
  if (ledState == LOW) {
    ledState = HIGH;
  } else {
    ledState = LOW;
  }
  digitalWrite(oscillatorPin, ledState);
}

Digital Lab 5

Here’s my commented code from this week’s lab:

int ledPin = 13;
int oscillatorPin = 14;
int speedPot = 0; // this establishes the initial value of speedPot
int buttonPin = 12;
int button2Pin = 10;

int midiChannel = 3;    // midi channel

int currentMidiVelocity = 0;
int currentMidiNote = 0;
float currentFrequency = 0;
unsigned long currentTime = 0; // unsigned long

// this is an array of mote frequencies mapped
// to MIDI notes.  It's crucial to what we're doing
// but don't worry about it for now unless you
// really want to
int midiFreqs[] = {8, 8, 9, 9, 10, 10, 11, 12,
12, 13, 14, 15, 16, 17, 18, 19, 20, 21, 23, 24, 25, 27, 29, 30, 32, 34, 36, 38, 41, 43, 46, 48, 51, 55, 58, 61, 65, 69, 73, 77, 82, 87, 92, 97, 103, 110, 116, 123, 130, 138, 146, 155, 164, 174, 184, 195, 207, 220, 233, 246, 261, 277, 293, 311, 329, 349, 369, 391, 415, 440, 466, 493, 523, 554, 587, 622, 659, 698, 739, 783, 830, 880, 932, 987, 1046, 1108, 1174, 1244, 1318, 1396, 1479, 1567, 1661, 1760, 1864, 1975, 2093, 2217, 2349, 2489, 2637, 2793, 2959, 3135, 3322, 3520, 3729, 3951, 4186, 4434, 4698, 4978, 5274, 5587, 5919, 6271, 6644, 7040, 7458, 7902, 8372, 8869, 9397, 9956, 10548, 11175, 11839, 12543};

void setup() {
  pinMode(ledPin, OUTPUT);
  pinMode(oscillatorPin, OUTPUT);
  pinMode(buttonPin, INPUT);
  pinMode(button2Pin, INPUT);

  // These two things here are called 'event handlers'.  Their one
  // argument is another function.  They set it so that when
  // you get a noteOn or noteOff event, the function you use
  // as the argument immediately runs one time.
  usbMIDI.setHandleNoteOn(onReceiveNoteOnMessage);
  usbMIDI.setHandleNoteOff(onReceiveNoteOffMessage);
}

void loop() {
  // you need this happening every loop for the event handlers
  // to work, just trust me
  usbMIDI.read();
  // this is defined below and should be self explanatory
  doAudio(); // calls the doAudio function
  buttonAudio(); // calls the buttonAudio function
  button2Audio(); //  calls the button2Audio function
}

void onReceiveNoteOnMessage(byte channel, byte note, byte velocity) {
  if(channel == midiChannel) {
    currentMidiNote = note;
    currentMidiVelocity = velocity;
  }
}

void onReceiveNoteOffMessage(byte channel, byte note, byte velocity) {
  if(channel == midiChannel) {
    currentMidiVelocity = 0;
  }
}

void doAudio() { // this function will play the straight note, the high octave, and then the low octave
  // a noteOff message always has a velocity of zero
  if(currentMidiVelocity == 0) {
    digitalWrite(ledPin, LOW);
  // otherwise its greater than 0 so its a noteOn, we play a note
  } else {

    digitalWrite(ledPin, HIGH);
    speedPot = analogRead(2); // this inputs the value of speedPot from Analog pin 2
    currentTime = millis();
    while(millis() < currentTime + speedPot) { // in other words, while millis() is less than millis() plus the value of speedPot
      playToneFromMidiNote();
    }

    currentTime = millis();
    while(millis() < currentTime + speedPot) { // see comment above
      playthirdtone();
    }
    currentTime = millis();
    while(millis() < currentTime + speedPot) { // see comment above
      playsecondtone();
    }
    }
  }

void buttonAudio() { // this sets up the function for the first button (will play straight note, then high octave)
  if(digitalRead(buttonPin) == HIGH) { // if the button is pressed
    speedPot = analogRead(2); // the value of speedPot is read from Analog pin 2
    currentTime = millis();
    while(millis() < currentTime + speedPot) { // see comment above in doAudio() function
      playToneFromMidiNote();
    }
    currentTime = millis();
    while(millis() < currentTime + speedPot) {
      playthirdtone();
    }
  }

  else if(digitalRead(buttonPin) == LOW) {
    digitalWrite(ledPin, LOW);
  }
}

void button2Audio() { // this sets up the function for the second button (will play straight note, then low octave)
  if(digitalRead(button2Pin) == HIGH) {
    speedPot = analogRead(2);
    currentTime = millis();
    while(millis() < currentTime + speedPot) {
      playToneFromMidiNote();
    }
    currentTime = millis();
    while(millis() < currentTime + speedPot) {
      playsecondtone();
    }
  }
  else if(digitalRead(button2Pin) == LOW) {
    digitalWrite(ledPin, LOW);

    }
  }

void playToneFromMidiNote() {
  currentFrequency = midiFreqs[currentMidiNote];
  playFrequency(currentFrequency);
  }

void playsecondtone() { // this is the function for the low octave
  currentFrequency = midiFreqs[currentMidiNote];
  playFrequency(currentFrequency/2);
  //this is where playFrequency finishes
}

void playthirdtone() { // this is the function for the high octave
  currentFrequency = midiFreqs[currentMidiNote];
  playFrequency(currentFrequency*2);
}

void playFrequency(int freq) {
  digitalWrite(oscillatorPin, HIGH);
  delayMicroseconds(1000000 / freq / 2);
  digitalWrite(oscillatorPin, LOW);
  delayMicroseconds(1000000 / freq / 2);
}

And here’s a video of everything working.

Digital Lab #4

Part 1a:

The Teensy microcontroller is creating a simplistic square wave sound by connecting with the digitalWrite() pin that’s connected to the button and the audio jack.

Part 2a:

int oscillatorPin = 13;

int cNoteButtonPin = 11;
int dNoteButtonPin = 12;
int eNoteButtonPin = 10;
int fNoteButtonPin = 9;

//you can find the frequency of different notes here:
//http://www.phy.mtu.edu/~suits/notefreqs.html
int middleCFrequency = 261;
int middleDFrequency = 294;
int middleEFrequency = 330;
int middleFFrequency = 349;

void setup() {
   pinMode(oscillatorPin, OUTPUT);
   pinMode(cNoteButtonPin, INPUT);
   pinMode(dNoteButtonPin, INPUT);
   pinMode(eNoteButtonPin, INPUT);
   pinMode(fNoteButtonPin, INPUT);
}

void loop() {

   if(digitalRead(cNoteButtonPin) == HIGH) {

      digitalWrite(oscillatorPin, HIGH);
      delayMicroseconds(1000000 / middleCFrequency / 2);
      digitalWrite(oscillatorPin, LOW);
      delayMicroseconds(1000000 / middleCFrequency / 2);

   } else if(digitalRead(dNoteButtonPin) == HIGH) {
      digitalWrite(oscillatorPin, HIGH);
      delayMicroseconds(1000000 / middleDFrequency / 2);
      digitalWrite(oscillatorPin, LOW);
      delayMicroseconds(1000000 / middleDFrequency / 2);
   } else if(digitalRead(eNoteButtonPin) == HIGH) {
      digitalWrite(oscillatorPin, HIGH);
      delayMicroseconds(1000000 / middleEFrequency / 2);
      digitalWrite(oscillatorPin, HIGH);
      delayMicroseconds(1000000 / middleEFrequency / 2);
   } else if(digitalRead(fNoteButtonPin) == HIGH) {
      digitalWrite(oscillatorPin, HIGH);
      delayMicroseconds(1000000 / middleFFrequency / 2);
      digitalWrite(oscillatorPin, HIGH);
      delayMicroseconds(1000000 / middleFFrequency / 2);
   }
}

Part 2b:

int oscillatorPin = 13;

int cNoteButtonPin = 11;
int dNoteButtonPin = 12;
int eNoteButtonPin = 10;
int fNoteButtonPin = 9;

//you can find the frequency of different notes here:
//http://www.phy.mtu.edu/~suits/notefreqs.html
int middleCFrequency = 261;
int middleDFrequency = 294;
int middleEFrequency = 330;
int middleFFrequency = 349;

void setup() {
   pinMode(oscillatorPin, OUTPUT);
   pinMode(cNoteButtonPin, INPUT);
   pinMode(dNoteButtonPin, INPUT);
   pinMode(eNoteButtonPin, INPUT);
   pinMode(fNoteButtonPin, INPUT);
}

void loop() {

   if(digitalRead(cNoteButtonPin) == HIGH) {

      playFrequency(middleCFrequency);

   } else if(digitalRead(dNoteButtonPin) == HIGH) {

      playFrequency(middleDFrequency);

   } else if(digitalRead(eNoteButtonPin) == HIGH) {

      playFrequency(middleEFrequency);

   } else if(digitalRead(fNoteButtonPin) == HIGH) {

      playFrequency(middleFFrequency);
   }
}

void playFrequency(int freq) {
   digitalWrite(oscillatorPin, HIGH);
   delayMicroseconds(1000000 / freq / 2);
   digitalWrite(oscillatorPin, LOW);
   delayMicroseconds(1000000 / freq / 2);
}

In the function playFrequency, freq serves as an argument.  This means that the frequency value of middleCFrequency, middleDFrequency, etc. gets assigned to freq.

Part 3a-1:

int ledPin = 13;

void setup() {
  Serial.begin(9600);
  pinMode(ledPin, OUTPUT);
}

void loop() {
  for(int i = 0; i < 10; i++) { //i starts at 0, goes up to 9, increases by 1
    Serial.println(i); // prints the value of i in the serial port
    digitalWrite(ledPin, HIGH);
    delay(500); //will delay this by 500 milliseconds instead of 250 ms
    digitalWrite(ledPin, LOW);
    delay(500); //will delay this by 500 milliseconds instead of 250 ms
  }

  delay(1000); // will delay the entire loop repeating by 1000 ms
//instead of 5000 ms

}

Part 3a-2:

What the original function blinkLED is doing is establishing and storing the values of blinkPin– in other words, if the LED is on or off, and how long it stays on and off for.  Essentially, for the first usage of blinkLED, the values ledPin and 500, respectively, become the values of blinkPin and blinkLength established in the blinkLED function.  For the second usage of blinkLED, led2Pin and i*100 become the values of blinkPin and blinkLength established in the blinkLED function.

int ledPin = 13;
int led2Pin = 14;

void setup() {
Serial.begin(9600);
pinMode(ledPin, OUTPUT);
pinMode(led2Pin, OUTPUT);
}

void loop() {
for(int i = 0; i < 10; i++) {
Serial.println(i);
multiblink(ledPin, 250);
multiblink(led2Pin, i * 300);
}

delay(5000);
}
void multiblink(int blinkPin, int blinkLength) {
digitalWrite(blinkPin, HIGH);
delay(blinkLength);
digitalWrite(blinkPin, LOW);
delay(blinkLength);

digitalWrite(blinkPin, HIGH);
delay(blinkLength);
digitalWrite(blinkPin, LOW);
delay(blinkLength);
}

This new function, multiblink, is very similar to LEDblink, except that both LEDs now blink twice in their completion of the circuit (LED 1 blinks for a specified time, LED 2 blinks for the number in the loop multiplied by 100), LED 1 blinks for 250 ms, and LED 2 blinks for the duration of 300 multiplied by the number in the loop.

Part 3b:

int ledPin = 13;
int led2Pin = 14;
int led3Pin = 15;
int buttonPin = 12;

//an unsigned long is type of variable just like int,
//but it can hold much bigger numbers, which can
//be useful sometimes
unsigned long millisecondsSinceReset = 0;

void setup() {
  Serial.begin(9600);
  pinMode(ledPin, OUTPUT);
  pinMode(led2Pin, OUTPUT);
  pinMode(led3Pin, OUTPUT);
  pinMode(buttonPin, INPUT);
}

void loop() {

  millisecondsSinceReset = millis(); //self explanatory

  if(millisecondsSinceReset < 3000) { //in the first 3 seconds
    digitalWrite(ledPin, HIGH); //turn this pin high
    digitalWrite(led2Pin, LOW); //turn this pin low
    digitalWrite(led3Pin, LOW); // turn this low

  } else if (millisecondsSinceReset < 5000) { //in the first 5 seconds after resetting
    blinkLED(led2Pin, 150); //execute blinkLED function (see below)

  } else if (millisecondsSinceReset < 10000) { //in the first 10 seconds after resetting
    blinkLED(led3Pin, 100); //executeblinkLED function (see below)

  } else { //if not in the first 3, 5, or 10 seconds after resetting
    digitalWrite(ledPin, LOW); // turn this pin low
    digitalWrite(led2Pin, LOW); // turn this pin low
    digitalWrite(led3Pin, HIGH); // turn this pin high
  }
}

void blinkLED(int blinkPin, int blinkLength) {
  digitalWrite(blinkPin, HIGH);
  delay(blinkLength);
  digitalWrite(blinkPin, LOW);
  delay(blinkLength);
}

Part 4:

For this part of the project, I essentially combined the BlinkLED function and playFrequency function from our previous labs.  What this program does is the following:

*when the button is pressed, a middle C Frequency is played (261 Hz)
*when the button is NOT pressed, the LED blinks in the pattern established in the blinkLED function (in other words, it blinks for the length of the position in the count (1 through 5) times 100).

Here’s a video: (the noise is pretty hard to hear, but you can look at the LED on the Teensy as well).

And here’s the code:


int oscillatorPin = 13;
int buttonPin = 12;
int led1 = 10;

int middleCFrequency = 261;
int middleDFrequency = 294;

void setup() {
Serial.begin(9600);
pinMode(oscillatorPin, OUTPUT);
pinMode(led1, OUTPUT);
pinMode(buttonPin, INPUT);

}

void loop() {
    if(digitalRead(buttonPin) == HIGH) {
      while(digitalRead(buttonPin) == HIGH) {
        playFrequency(middleCFrequency); }

    } if(digitalRead(buttonPin) == LOW) {
    while(digitalRead(buttonPin) == LOW) {
      for(int count = 0; count <5; count++) {
        blinkLED(led1, count * 100);

      }
    }
    }
    }

void playFrequency(int freq) {
   digitalWrite(oscillatorPin, HIGH);
   delayMicroseconds(1000000 / freq / 2);
   digitalWrite(oscillatorPin, LOW);
   delayMicroseconds(1000000 / freq / 2);
}

void blinkLED(int blinkPin, int howlong) {
  digitalWrite(blinkPin, HIGH);
  delay(howlong);
  digitalWrite(blinkPin, LOW);
  delay(howlong);
}